Testing in the Developer Sandbox
- Whitelist Treasury Prime’s IP addresses in your firewall or network security rules to ensure your server can receive incoming Card Auth Loop Endpoint callbacks. Contact Treasury Prime Support for the current list of IPs to whitelist.
- Create a new Card Auth Loop Endpoint.
- Update the
card_auth_loop_endpoint_idof the Card Product you would like to receive authorization requests for with theidof the Card Auth Loop Endpoint you created. - Create a new
card_event.auth_requestCard Simulation to mimic a card authorization taking place. - An HTTP POST request will be sent to the URL listed in the Card Auth Loop Endpoint containing an
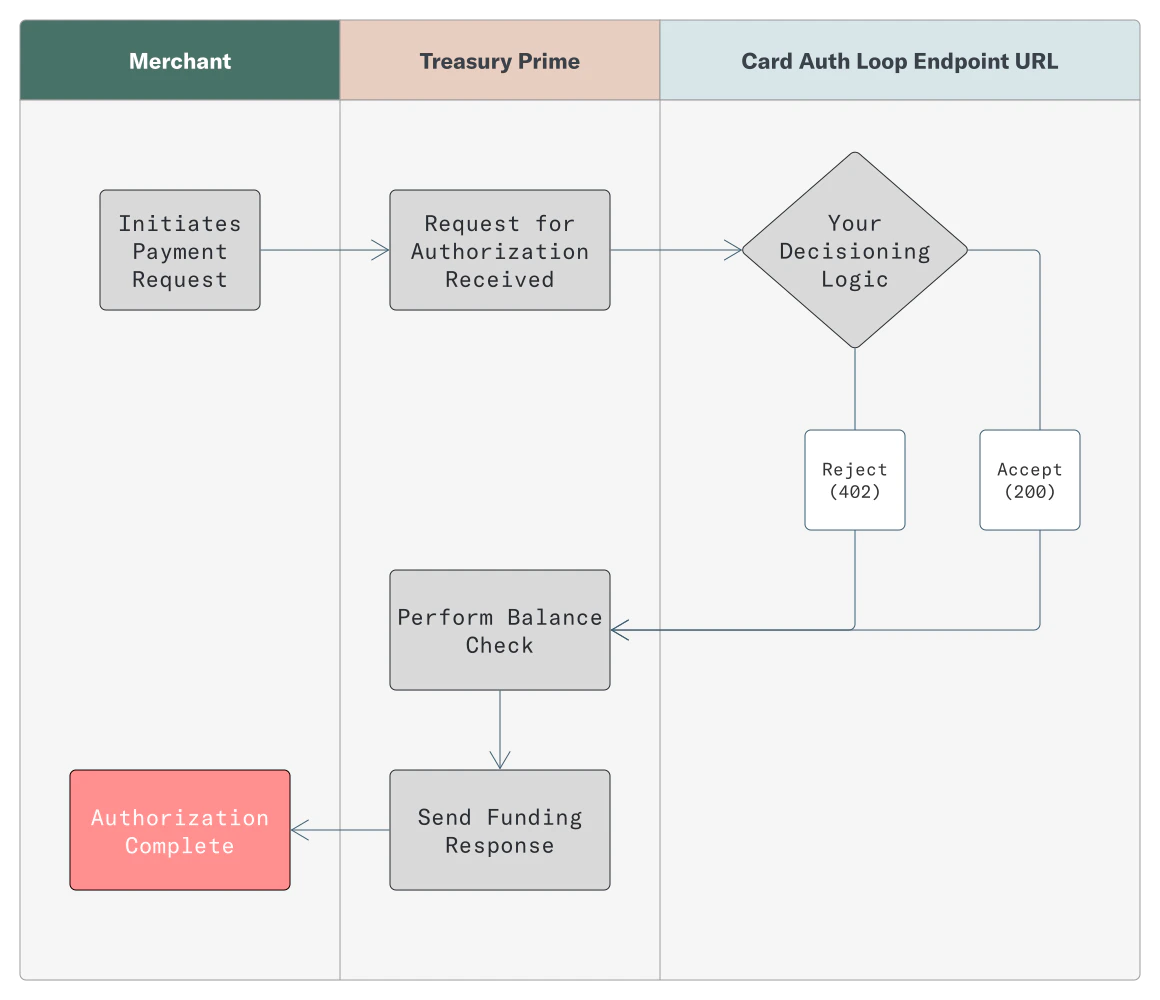
auth-requestCard Event in the message body (example below). - You now have 1500 milliseconds to respond with a 200 (to approve the request) or a 402 (to reject the request).
- If you do not respond, the
default_responseset in the Card Auth Loop Endpoint will take effect. Please see the warnings below.
Testing in Production
- Whitelist Treasury Prime’s production IP addresses in your firewall or network security rules to ensure your server can receive incoming Card Auth Loop Endpoint callbacks. Contact Treasury Prime Support for the current list of IPs if you have not already done so.
- Create a new Card Auth Loop Endpoint.
- Update the
card_auth_loop_endpoint_idof the Card Product you would like to receive authorization requests for with theidof the Card Auth Loop Endpoint you created. - Initiate authorization by swiping or submitting a virtual payment using a card issued under the Card Product from step 2.
- An HTTP POST request will be sent to the URL listed in the Card Auth Loop Endpoint containing an
auth-requestCard Event in the message body (example below). - You now have 1500 milliseconds to respond with a 200 (to approve the request) or a 402 (to reject the request).
- If you do not respond, the
default_responseset in the Card Auth Loop Endpoint will take effect. Please see the warnings below.
Card Auth Loop Endpoint Default Response
You can set thedefault_response to "approved" or "denied", with the standard setting being "approved".
Customizing Your Response
By default, a200 response approves the full requested amount, and a 402 response uses the standard Card Auth Loop Endpoint Denied Request decline reason. You can optionally include a JSON body with your response to customize this behavior:
amount(on a200response): A decimal string specifying a partial amount to approve. It must be positive and no greater than the requested amount; any other value is ignored and the full requested amount is approved. Note that a final balance check still takes place after your response is received, so the actual approved amount may be reduced further if funds are insufficient.decline_reason(on a402response): A string, up to 255 characters, appended to the standard decline reason and surfaced in thedecline_reasonfield of the resulting Card Event, e.g.Card Auth Loop Endpoint Denied Request - 082.
Example Card Auth Loop Endpoint Callback
When a card authorization request is received, an HTTP POST will be sent to the URL specified in the Card Auth Loop Endpoint object. The POST body contains a Card Event object as shown below.Distinguishing Original Credit Transactions (OCT)
Original Credit Transactions (OCTs) — such as disbursements from third-party services — also trigger Card Auth Loop Endpoint callbacks. Themessage_type field in the callback payload distinguishes these from regular spending authorizations:
auth-request— Regular spending authorization (money leaving the account)original-credit-auth-request— OCT authorization (money arriving to the account)original-credit-auth-clear-request— OCT authorization and capture in one message
message_type field to apply different business logic for incoming credits. For example, you may choose to skip balance checks for OCTs since they represent funds being added to the account rather than spent.